
What does every science book start with? The scientific method. Wait ... don't run away. Please, take a deep breath. In. Out. There. Okay. Just hear me out.
In science, there is an organized way to thinking about problems, and it is called the scientific method. Scientists use this method to organize their decision making process, but it is not limited to only scientific minds. Whether we realize it or not, when coming across a problem or desire, everyone (more or less) thinks "How can I make this work?" The scientific method is just an organized way of doing so. I think it can be used to figure out answers to your quilting or crafting problems as well. Or ANY problems, you might say.
Okay, so what, a bunch of scientists got together and started organizing and classifying things, so what? Do I have to go through this formal 'decision making process' EVERY time I run across something I need to decide? No. But it is there and it is a way to organize your thinking, which could save you time and money in the long run. There is something about the creative process which does seem spontaneous, and doing this method may seem to take away from that. However this is for all those quilters out there who have to do it right the first time, better make sure seams are perfect and straight and all points match exactly. These quilters may appreciate an alternate approach to their favorite hobby. Or just say "pbbbt." and never read this blog again.
There are many variations to the "official" Scientific Method , but the main steps are:
- Observation
- Question
- Hypothesis
- Experiment
- Conclusion
- (Repeat steps 2-5 until you get a satisfactory conclusion)
Oh, so you've learned this already way back in 7th - 8th grade? Well consider yourself lucky to be able to retain this. For the rest of us, let's expore each step in depth using an example. Let's say I want to make a quilt.
ObservationThe first step is to observe something. In this example you see a quilt pattern you like. You observe the pattern, you see something in it that is worth remembering, bookmarking (if you're on the internet a lot), taking a picture of, thinking about. You observe it, you want to recreate it, (or it enspires you to think of a similar pattern).
QuestionThe question may be in this situation "What colors do I want for this quilt?"
HypothesisMost people have a general idea of colors they like, patterns they like, types of fabric they like. It is in this stage that they start to say "I'd like it to be in blues and greens". That's a hypothesis to the question the colors you want in the quilt.
ExperimentThe meat of the method. This is where you get to try things out. There could be many different approaches to experiment for our simple question of the quilt colors. Some ideas that I've run across for experiments. (there are a lot here)
a) Buy (or use if you own)
Electric Quilt program computer software. I personally have no experience with this but I hear that you can scan in your fabric and it can do layouts and patterns and give you an example of what your quilt might look like.
b) Buy graph paper and colored pencils and do a mock-up drawing for your quilt. This I just

tried last night with a patchwork apron I was working on, and it helped me organize so much. I was able to draw the colors I wanted and count the number of squares of each color I needed, and draw the rows I wanted to piece together.
c) Fold small bits of fabric and try to see small swatches of fabrics together as a grouping. Squint your eyes to see if the values look good together, switch out different small swatches trying new variations. Personally I have already drawn a sketch of a card trick quilt block that had black background with fibrant colors. I started actually looking at my fabric stash at the time, folded small sections of fabric, laid out in the generic card trick pattern, came out with a completely different fall color looking design which I love and I never would have picked out just drawing them.
d) Go back to your observations and look up certain colors of quilts on the internet. Just don't copy exactly "fabric for fabric" what other people have done, but I am sure that no one has copyrighted the idea that "red can go with blue".
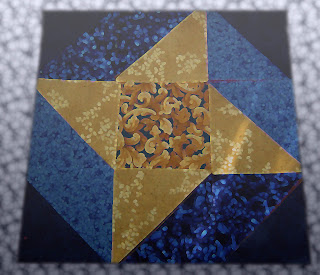
e) Cut out a single block or a mini block. I did this for my first quilt when I couldn't figure out the colors exactly. I made two versions of the block with a small variation, took a picture of each and then uploaded them both to my computer. This result is the pictures at the top of this post, the Ribbon pattern from Carol Doak's Your First Quilt Book pp 141-147.
f) Look at a color wheel. There are color wheels everywhere. I saw the local crayola store has one made of crayola crayons. Photoshop has one, even in the Sims3 there are color wheels on the outfits. And don't forget to play around with these electronic tools. I have found many times just spending time on photoshop or arranging outfits on the Sims, which colors work next to other colors. Doing some hue sliders is kinda fun and it gives certain color groupings that work because other color groupings work.
g) Ask someone at a quilt shop. I am taking a class in a few weeks that is a small baltimore album style wall hanging. I don't generally like the light brown / white neutral backgrounds (I am sure that will change - I also know its harder to do applique with, but I don't care, I want something I like as an end result), so I wanted to go with a black background. I found a person who had more color experience than I did and we went around the quilt shop looking at fabrics and having fun putting them together. I think even the person who helped me enjoyed it too.
Conclusion
After you go through steps a-g above, or any, or neither, or just jump in and make the quilt, you eventually will go through the process of creating the quilt and seeing the result.
I have one that I liked, but when I put it together, (made a ton of blocks for it) I kept thinking - boy all I can think of is the "purina dog chow" because of the red and white patchwork on it. So my conclusion was not what I wanted. Luckily this was before it was sewn together, and so I could go back to my question step "what would happen if I tried to put a small four patch of red and white", and then I went back through the 'design process' again, and this time came to something I like.
I heard another story of a woman who had a blue and white quilt that had bright hot pink borders. And granted the colors went together well, but she said that the borders were just screaming for attention, and even though she liked the combo, she ripped the borders out and replaced it with a darker maroon.
Post Conclusion
That's the Scientific Method. I could have done the same thing with having a color combination I liked and made the question "What pattern would best fit these colors?" When I was making my few quilt tops that I have finished, at each step of the way I was constantly coming back to other questions, ones about color values, pattern size, and others that didn't make it into this example. And NO I wasn't going in my head "question", "hypothesis", I was just thinking about what I would like, and how would I try to figure it out before making the whole thing. I also know I talked about making more than one quilt to show all the different experiments I have tried.
Yes I realize that this entire Scientific Method is all based on the subjective example "what do you like", and that one person going through this process will think entirely different things than the other person, and one could argue that that's not science. To some respect, I do like my science to be black/white, right/wrong, good/bad ... all these absolutes. However, the more I learn about science is that 1) it's always changing, and 2) there is hardly absolutes, and 3) who cares about absolutes in the creative process all the time. (This is the subject of an entirely different blog post.) This also didn't discuss the idea of control variables and changing only one item at a time (for those science folks who are there), and what makes a good experiment.
If you're still with me, I commend you. I expect most of my posts to be long, I always find a lot to write about. I hope you enjoyed the journey down the left and right brain.


 Hydrogen & other gas Spectra Quilt - This could be an easy strip quilt, that has a lot of black and bright colors. You could have rows of the different gases, like Argon, Sodium, Neon, Mercury and then colors at about the appropriate locations.
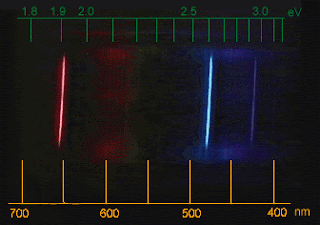


